Showing posts with label Dynamics AX. Show all posts

Demo Data for Microsoft Dynamics AX 2009 (en-us)

July 20, 2008

The much awaited Demo Data for Microsoft Dynamics AX 2009 RTM has been released about 10 days ago. However, only demo data for United States English is available at the moment. No news on the availability of demo data in other languages thus far.

As we have seen in the VPC images, the official demo data is base on Contoso Entertainment systems group of companies instead of the Global Trade and Manufacturing Company used in Microsoft Dynamics AX 4.0. In fact, I suspect the data could very well be the same copy as the latest VPC image released.

Dynamics AX Import vs. SQL Server Backup

The demo data available for download comes in two formats. You may chose between the more conventional Microsoft Dynamics® AX DAT where you import through Dynamics AX Data Import utility and Microsoft SQL Server Backup we have been offered recently. The following table shows the different between the two formats.

Microsoft Dynamics AX DAT Microsoft SQL Server Backup
Smaller download size (179 MB - 216 MB) Bigger download size (403 MB - 419 MB)
Slower import time (25 - 150 minutes) Faster restore time (2 - 4 minutes)
Does not include with demo license Demo license included (expires June 6, 2009)
More complicated import routine Simple restoration routine
Master configuration preserved Reconfiguration required after restore.

So how shall we decide? First of all, you have to identify whether you are storing your AX data in Oracle database or Microsoft SQL Server database. If you have an Oracle database, you should just opt for Microsoft Dynamics AX Data Import. I am not suggesting that the other option is impossible but I guess it is not worth the effort.

The second factor would be Dynamics AX license. I noticed many associates searching for the demo license. I have suggested the possibility of using Dynamics AX 2009 CTP3 Ver02 demo database backup while waiting for partner license in What you need to install Microsoft Dynamics AX 2009. This newer version of demo data comes with demo license that expires on June 6, 2009. If you really need that license, Microsoft SQL Server Backup should be your choice.

If the previous two factors have not helped you decide, let's look at the two time factors; download time and import time. The Dynamics AX DAT file is almost half the SQL Server backup file in size which shall requires about half the time to download. However, the time required to import the AX DAT file is extremely high compared to restoring SQL Server backup.

I have tried both approaches on my humble Xeon dual core with 2 GB of RAM. Importing Dynamics AX DAT file with transaction took my server no less than 3 hours. Because the data is divided into a few files for different company, etc. the process requires interaction in between. Restoring the SQL Server backup on the other hand took the same server no more than 3 minutes.

The ftp server that hosts the files is fairly fast hence download time should not really be a problem if you have decent Internet connection. If your Internet connection is known for bad download performance, you may just opt for go for the smaller download and be patience importing data.

Download Demo Data

You may find further information from the download page at PartnerSource: Demo Data for Microsoft Dynamics AX 2009. The following table shows the four options given. You just need one of these files. Pick one that suits your needs. If you are going for AX Data Import, I would strongly suggest that you follow the instruction found in Loading Contoso Demo Data.

Download Description File Size
ContosoBase.DAT AX Import without transaction 179 MB
ContosoTrans.DAT AX Import with transaction 216 MB
ContosoBase.BAK SQL Backup without transaction 419 MB
ContosoTrans.BAK SQL Backup with transaction 403 MB

Dynamics AX 2009 Installation - Application

July 5, 2008

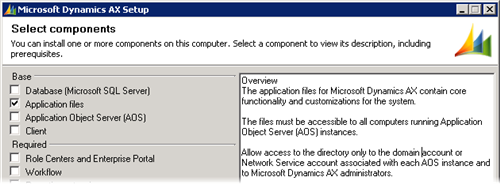
The second component in the installation is the Application files. It resides on the File Server discussed in Microsoft Dynamics AX 2009 Components. These are the files where Microsoft Dynamics AX business logic resides. The following screenshot shows the option in Dynamics AX 2009 setup that installs the application files.

Dynamics AX 2009 Setup - Application files

What to take note

There are two areas I would like you to take note prior to running the installation; the location and disk space.

The Application files are meant to be accessed by Dynamics AX Application Object Server (AOS). Hence, you have to make sure that the location where you install the Application files is accessible by the computer you intend to install the AOS and the account that starts the AOS service has rights over the directory.

A typical production environment has multiple AOS instances running on multiple computers for load balancing. These AOS instances would be configured to access one set of Application files. Therefore, it is common that the Application files are installed in a shared folder.

In term of disk space, an instance of Microsoft Dynamics AX Application files takes up some 3 GB of hard disk space. Expect another 500 MB or so taken upon completion of installation where indexes are built. So, please plan your Application files location properly.

Dynamics AX Setup - Application

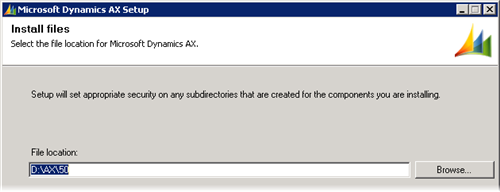
The Application files setup is straightforward. You just have to specify the location, instance name and select optional functionalities. The following screenshots shows the information collected.

Dynamics AX 2009 Setup - Application files Location

Notice the folder structure created with the location you specify previously as the base. A folder named after the instance name you have chosen will be created to store the instance specific Application files.

Dynamics AX 2009 Setup - Application files Instance name

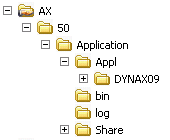
Upon completion, you will have a new Dynamics AX application instance. You shall have the folder structure inside the location you have selected (D:\AX\50 in this case) as shown in the following image.

Dynamics AX 2009 Setup - Application files Folder structure

Conclusion

You should be able to get Microsoft Dynamics AX Application files installed without much drama.

Dynamics AX 2009 Installation - Database

July 1, 2008

We will look at the first component in a Microsoft Dynamics AX installation; database. The following screenshot shows the option in Dynamics AX 2009 setup that achieves this. This option will create a database in Microsoft SQL Server with the necessary stored procedures. If you intend to use Oracle database, you will have to create the database manually. Do take time to ensure you have the required software installed.

Dynamics AX 2009 Setup - Database

You may run this setup on any computer that has access to the Database server. The user account that you use to execute this must be a member of the dbcreator role on the target SQL Server instance. If you are using the administrator account, your account will most likely be a member of the sysadmin role which has the rights of all the roles combined. The following figure shows the property page of a SQL Server login.

Dynamics AX 2009 Setup - Database server role

Before you begin

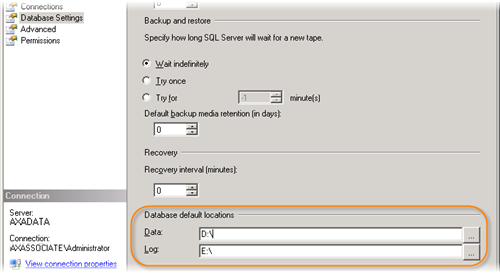
Before you jump into the installation of this component, there one thing I would like you to take note. The installation creates a database without asking you for the location of your data file and log file. It is important that these files are in separate and preferably dedicated physical drive. I suggest that you configure the default file locations in accordance your database server storage plan. This specifies the data and log files locations for databases created subsequently.

Dynamics AX 2009 Setup - Database: default database locations

Dynamics AX Setup - Database

The Database installation is fairly simple. You just have to specify the Microsoft SQL Server instance you would like to create the database on and the name you would like for your new database. The following screenshot illustrates the information collected for this setup.

Dynamics AX 2009 Setup - Database: Create new SQL Server database

Upon completion, you will have a new database with two user stored procedures; CREATESERVERSESSIONS and CREATEUSERSESSIONS. The rest of the objects will be created in subsequent steps of the installation.

Database Access

This database is intended to be accessed by appropriate AOS instances. The account that starts the AOS instances requires certain authority to work correctly. The account must be assigned the db_datareader, db_datawriter and db_ddladmin database roles as shown in the figure below. The first two roles allows AOS to read and write data on the database whereas the final role allows the AOS to create, change and remove objects in the database. DDL in the role name refers to data definition language.

Dynamics AX 2009 Setup - Database User role

Besides these database roles, the AOS account also need execute permission on the two procedures; CREATESERVERSESSIONS and CREATEUSERSESSIONS. The following figure shows the permission configuration for stored procedure.

Dynamics AX 2009 Setup - Database: Stored Procedure permission

Conclusion

This step of the setup process takes little time. There are just a few minor things you should take note to ease the installation of other components as well as administration the system in the long run.

What you need to install Microsoft Dynamics AX 2009

June 27, 2008

As mentioned in Microsoft Dynamics AX 2009 Components, Dynamics AX 2009 is a lot more than just AX Application, AOS and client. It has also expanded externally with integration to various other technologies to achieve its objectives.

As a result, installing Microsoft Dynamics AX 2009 requires more than the installation DVD. This post will provide you with an overview of the software components and their download sources to get you better prepared for the installation.

Some of the components presented below do come in the form of DVD if your company subscribe for them. If you have such luxury, browse through your DVD set to secure them before you set off to install Microsoft Dynamics AX 2009. Otherwise, you might have to spend a day or more to get all of them downloaded.

Microsoft Dynamics AX 2009 Release DVD ISO

Dynamics AX 2009

The most important part is of course the installation DVD itself. You may download the Microsoft Dynamics 2009 Release May Edition DVD ISO file (1.7 GB in size) from PartnerSource as discussed earlier. As far as I am concerned, no physical media should be expected until mid July 2008 when the translation of help topics is scheduled to complete. The DVD ISO file seems to be the only option at the moment.

Since it is in ISO format, you may use any Virtual DVD software to mount it as a DVD disc to use it directly or to extract the files to a physical location. On top of that, you may also burn it into a physical DVD. If you are installing on virtual machines instead, you could load it to the optical drive with ease. All virtual machine platforms I know supports ISO image, be it Microsoft Virtual PC, Virtual Server, VMWare or VirtualBox.

Microsoft .NET Framework 3.5

Microsoft .NET Framework

Microsoft Dynamics AX 2009 utilized the latest features from Windows Presentation Foundation, etc. You need to install Microsoft .NET Framework 3.5 before you are able to install Microsoft Dynamics AX 2009. The table bellow shows the options you have to get the .NET Framework 3.5 installed. Pick one that suits your need best.

Component File name File size
Microsoft .NET Framework 3.5 Live Installer dotNetFx35setup.exe 2.7 MB
Microsoft .NET Framework 3.5 Full Package dotnetfx35.exe 197.11 MB

The Live Installer (bootstrapper) is meant for installation with Internet connection. It will evaluate your system to identify further download required. The installation will requires additional file download of 50 - 200 MB depending on how up to date your system is. This is the better choice for single installation. You will usually end up downloading less than the full package.

The Full Package on the other hand is meant for mass deployment. The download consists of all the files necessary to install the .NET Framework 3.5. You may also want to pick this option if you would like to share the file with other associates.

Service Pack 2 for Microsoft SQL Server 2005

Microsoft SQL Server 2005

If you are hosting your Dynamics AX 2009 data with Microsoft SQL Server 2005, you will need Service Pack 2 or later. This service pack has been released for over a year. In case you have not updated your Microsoft SQL Server 2005 to SP2, you may download the update at Microsoft Download: SQL Server 2005 SP2.

This package contains update for all the components of Microsoft SQL Server 2005 including the database server, Analysis Services, Reporting Services, etc. They are all required for Microsoft Dynamics AX 2009 installation.

Dynamics AX 2009 Demo Data

There is no official demo data available for Dynamics AX 2009 Release yet. The closest we could find is the demo data for AX 2009 CTP3 VPC version 2. This download is in the form of Microsoft SQL Server database backup instead of the usual Dynamics AX data import file we are familiar with. In order to use this data, you will not have to install the database option in the setup. You should restore this backup as a Microsoft SQL Server database and install the application and AOS to connect to it.

I notice a lot of associates are searching for Dynamics AX 2009 license. If you install with this demo database, you will have the demo license which last until August 31, 2008. This could be a good option in case you have not got the partner license file.

Component File name File size
Demo data AX 2009 CTP3 VPC Ver02 Demo data AX 2009 CTP3 VPC Ver02.zip 129 MB

Microsoft Windows Sharepoint Services 3.0 with Service Pack 1

Microsoft Windows Sharepoint Services

Sharepoint Services 3.0 SP1 is required to host the Role Centers and Enterprise Portal. It is not included in the Dynamics AX 2009 Installation DVD. You have an option to use Microsoft Office Sharepoint Server 2007 or Microsoft Windows Sharepoint Services 3.0.

If Windows Sharepoint is your choice and your machine does not have it installed, you would have to download it first. It is available for download at Microsoft Download.

Component File name File size
Windows SharePoint Services 3.0 with Service Pack 1 SharePoint.exe 104.1 MB
Windows SharePoint Services 3.0 x64 with Service Pack 1 SharePoint.exe 115.4 MB

Windows SDK for Windows Server 2008 and .NET Framework 3.5

Windows SDK is required for Reporting Extension to work. You may get the Windows SDK for your operating system. Windows SDK for Windows Server 2008 and .NET Framework 3.5 is the latest at the time of writing. It could be used for Windows Server 2003, Windows Server 2008, Windows Vista and Windows XP.

Like Microsoft .NET Framework 3.5, you have an option to get it installed through web setup or the complete package. The complete package for Windows SDK for Windows Server 2008 is in DVD ISO format.

Component File name File size
Windows SDK for Windows Server 2008 and .NET Framework 3.5 Web Setup Setup.exe 418.59 KB
Windows SDK for Windows Server 2008 and .NET Framework 3.5 DVD ISO 6.0.6001.18000.367-KRMSDK_EN.iso 1330 MB

Microsoft Visual Studio 2008 Shell (isolated mode) Redistributable Package

This package is required for the Reporting Extension to work. There are two Microsoft Visual Studio 2008 Shell redistributable package; isolated and integrated. Make sure you are having the isolated package.

When you install this package, please note that the executable vs_AppEnvRedist.exe extracts the installation files to a location. You should execute the actual installation file found at the location where you extracted the files.

Component File name File size
Microsoft Visual Studio 2008 Shell (isolated mode) Redistributable Package vs_AppEnvRedist.exe 384.4 MB

Conclusion

The software prerequisite for getting Microsoft Dynamics AX 2009 installed is more than those we have listed here. The rest of the software is included in the installation DVD.

Happy installing Microsoft Dynamics AX 2009.

Microsoft Dynamics AX 2009 Components

June 16, 2008

After all the excitements around the launch of Microsoft Dynamics AX 2009 RTM with an abundance of all round improvements penned in the roadmap. It is time to take a closer look at the new tool that we will use in the coming battles before we get our hands on it.

Dynamics AX 2009

Apart from the improvements in term of functionalities, Microsoft Dynamics AX 2009 has incorporated numerous technologies under Microsoft to improve communication and visibility of the solution. In Microsoft Dynamics AX 3.0 and 4.0 implementations, I have configured quite some Analysis Services cubes and Reporting Services reports to provide visibility. Microsoft Dynamics AX powers the operation well in those releases but is lacking in term of business process monitoring and business analysis capability out-of-the-box.

Microsoft Dynamics AX 2009 on the other hand has taken a different direction. A huge portion of the functionalities are taken out of Microsoft Dynamics AX. Dynamics AX 2009 comes with plenty of Analysis Services cubes and Reporting Services reports preconfigured. Then there is this dashboard that is hosted by Sharpoint Services. There is also integration with Microsoft Unified Communication, Microsoft Project Server, etc. The following figure shows the various components we may have in a Microsoft Dynamics AX 2009 installation.

Dynamics AX 2009 Setup - Select components

Let us look at the servers in a Dynamics AX 2009 production environment with all these additions. We could divide the servers into three categories; base servers, extension servers and infrastructure support servers.

Base Servers

The base installation consists of the traditional components which include the Database, Application files, Application Object Server (AOS) and the Windows client. There are three servers under this category.

Database server

As the name suggests, this is where Dynamics AX data is stored. Microsoft Dynamics AX 2009 could work with Microsoft SQL Server database as well as Oracle database. Although Oracle database server supports various editions of UNIX, Linux and Windows, supports for Oracle database is limited to issues that could be reproduced with Oracle under Windows environment.

File server

The Microsoft Dynamics AX application files are installed here. The application files installed here will be accessed by all Application Object Servers (AOS) in the environment. Access rights should be configured accordingly.

Application Object Server (AOS)

This server hosts the AOS Windows service. The AOS service coordinate communications among database, application files and the Microsoft Dynamics AX clients. AOS could be installed on a single computer or a server cluster for load balancing.

Extension Servers

Servers under this category add functionalities to Microsoft Dynamics AX.

Role Centers and Enterprise Portal

This server hosts a Microsoft Windows Sharepoint Services site. This server exposes the role center and enterprise portal functionalities to relevant users. You may run Windows Sharepoint Services or Microsoft Office Sharepoint Server to enable these functionalities.

Workflow server

A workflow server runs the Windows Workflow Foundation. It enables the creation of individual workflows as well as business processes in Microsoft Dynamics AX. It controls how a document flows through the system for processing and approval.

Reporting server

A reporting server uses Microsoft SQL Server Reporting Services to add reporting functionality to Microsoft Dynamics AX.

OLAP server

An OLAP server uses Microsoft SQL Server Analysis Services to provide multidimensional reporting functionality to Microsoft Dynamics AX.

Application integration server

An application integration server runs the Application Integration Framework (AIF). It allows the sharing of electronic business documents between Microsoft Dynamics AX and external parties.

Infrastructure Support

The servers mentioned earlier are either the integral part of Microsoft Dynamics AX or add specific functionalities to Microsoft Dynamics AX 2009. Those under this category provide supports. The compulsory server under this category is the domain controller. We could have SMTP server to provide email abilities to alert, mass mailing, etc.

Final Thoughts

With all these additions, you are unable to appreciate Microsoft Dynamics AX 2009 with the traditional base installation where you configure the Database, Application, AOS and Dynamics AX client. At the very least, you need to have the Analysis Services, Reporting Services, and Sharepoint Services.

Download Microsoft Dynamics AX 2009 Release

May 24, 2008

Dynamics Ax logo

A lot of us have been looking forward to the release of Microsoft Dynamics AX 2009 since the release of CTP3 a couple of months back. Dynamics AX associate is glad to announce that it is finally here. You may download the installation DVD in ISO format from PartnerSource: Microsoft Dynamics AX 2009 Release. Before you head over with excitement, please note that the file is 1.7 GB in size. Prepare enough hard disk space and time to download it. The page also provides plenty of important information that you could digest while you are waiting for the file to download.

The Microsoft Dynamics AX 2009 Release available for download here is a full install. You may perform new installations or upgrades from previous versions with it. Upgrades are supported for Microsoft Dynamics AX 3.0 SP4 (or higher) as well as Microsoft Dynamics AX 4.0 SP1 (or higher).

Businesses interested in putting Microsoft Dynamics AX 2009 into their business could do so very soon. The price list will be available for most of the regions by June 1, 2008. Those in Australia, Belgium, Luxembourg, New Zealand and Turkey however would have to wait a little longer or find ways with the operation center in their region. The price list for those regions is only planned to be available by September 1, 2008.

Reverse Engineering Microsoft Dynamics AX

April 11, 2008

The Reverse Engineering tool is a feature newly added to the integrated development environment (IDE) of Microsoft Dynamics AX. This tool replaces Visual MorphXplorer which has been removed in version 4.0.

Dynamics AX Reverse Engineering

As the name suggest, this tool helps us retrieve detail information on the structures and relationships of Microsoft Dynamics AX objects. The retrieved information is transformed to a visually readable format in Microsoft Office Visio UML model. Technically, Dynamics AX will create a Microsoft Office Visio Drawing file (.vsd) using the Visio application component and construct a UML model with Visio UML add-on programmatically. Therefore you will need Microsoft Office Visio 2003 or greater with Visio UML model installed in order to use this tool.

Scoping Your Model

Naturally scoping required to create useful models. This allows us the flexibility to define what we want to include. In my opinion, a model of the complete Dynamics AX application would be too huge to be useful if not too time consuming to generate and maintain.

Dynamics AX Reverse Engineering tool scopes the model through development projects either private or shared. So you must first create a project and include the elements that you would like in your model in the project in order to generate a model.

Types of Model

This tool is capable of generating two types of model; data model and object model. Let's see what does these models capture and how do they differ.

Data model mainly captures tables. Tables within the project as well as tables referenced by them are included in the model. Tables within the project are grouped by the AX TableGroup property. They are organized under groups named Main, Group, Miscellaneous, Parameter, Transaction, WorksheetHEader and WorksheetLine. Referred tables will be placed under the group External Classes.

You will also find relevant information such as fields and its data type, indexes, and relationship of each table in the generated model. The data type of these fields is modeled in Dynamics AX Extended Data Type. Dynamics AX Extended Data Type used by the model is included under the group External Data Type. This is the same for Dynamics AX Base Enums. The referenced enumeration with their members is captured under group Base Enums.

Due to the use of Visio UML model, each of these tables will be represented by a class and fields are modeled as attributes. However, table method is not included here. Table method is an important feature of Dynamics AX development platform but methods are not quite relevant for data model.

Those that would like to have the methods included could use the object model instead. However, that model will not have data model information such as relationship and index.

Object model will capture classes, tables, and interfaces relevant to the project. This includes referenced objects as well. Tables and classes within the project are generated under the main group without further grouping. Referenced objects are placed under group External Classes just like Data Model.

The properties and methods of the classes are modeled as attributes and methods in the class diagrams. Table entities are modeled the same way too. Information synonymous to object model such as class extends another class, class implementation of an interface and call between classes are found in this model.

Data type that the properties and methods uses in the form of Dynamics AX Extended Data Type are included in the model under Extended Data Type group. The same happens to Base Enums.

The table generated in Object Model will have table methods modeled as method unlike those in Data Model. Since this is an object model, you will not find information such as field index and table relationship in this model.

InformationData modelObject model
TablesYesYes
Related tablesYesYes
Table fieldsYesYes
Table methodsNoYes
Table group propertyYesNo
Field indexYesNo
ClassesNoYes
Referenced classesNoYes
Extended Data TypesYesYes
Base EnumsYesYes
X++ Data TypesYesYes

How to Generate

This feature is only accessible through the context menu. The following are the steps to generate a UML model using this tool.

Dynamics AX Reverse Engineering Menu
  1. Create a project and move the elements you would like in the model into this project.
  2. Right click on the project and select Add-Ins>Reverse Engineer.
  3. This will load a form named Visio Reverse Engineering. Enter the path and filename for the Visio drawing file.
  4. Select the model you want to generate then press OK. You may generate either data model or object model.

Conclusion

This is good news for those that are already using Microsoft Office Visio for their modeling tasks and is familiar with Visio UML model. I have tried my hands on Visio UML model years ago but have never developed a liking for it.

Those that have already got used to generating data model with Visio Data Model Diagram might find the data model reverse engineering redundant. I agree that Visio Data Model produces excellent model but it reverse engineer at the database level. The challenge with AX is that a lot of information is not implemented at the database. AX relies heavily on extended data type and enumeration implemented at the application level. Another challenge is AX implementation of temporary table which does not appear in the database.

These challenges are addressed with the use of AX Reverse Engineering tool. Field data type will be represented in extended data types. Information regarding extended data types and base enums are included in the model too. Temporary tables could be included in the model. This is something that even the MorphXplorer does not support.

Is this better than MorphXplorer, the tool it replaced? I see much more information compared to MorphXplorer. The outcome is more professional too.

Download Demonstration Toolkit for Microsoft Dynamics AX 2009 Pre-Release

March 27, 2008

There has been much hype around the soon to be released Microsoft Dynamics AX 2009. Certain companies were given the privilege to get their hands on Microsoft Dynamics AX 5 Community Tech Preview 3 (CTP3). Do note that the name was the initially expected Microsoft Dynamics AX 5 instead of Microsoft Dynamics AX 2009 which it is currently called.

Demonstration Toolkit

Microsoft Dynamics AX Demonstration Toolkit cover

It has been a common practice for Microsoft Dynamics to issue Demonstration Toolkit for Microsoft Dynamics AX in the form of Virtual PC (VPC) image. The Demonstration Toolkit for Microsoft Dynamics AX 4.0 SP1 for example was distributed in the form of two DVDs. The package comes with marketing material and presentation decks for different industries, and VPC Images for Microsoft Virtual Server as well as Microsoft Virtual PC.

Microsoft Dynamics has done the same for the Pre-Release of Microsoft Dynamics AX 2009. The Demonstration Toolkit for Microsoft Dynamics AX 2009 Pre-Release is available for download at Demonstration Toolkit for Microsoft Dynamics AX 2009 Pre-Release (requires PartnerSource login).

You will need Microsoft Virtual PC to use this toolkit. The good news is it is a freeware available for download. Get your free copy of Microsoft Virtual PC 2007 downloaded to run the Demonstration Toolkits.

Disk Space Requirement

Usually this toolkit is distributed in DVDs. Hence, do expect the download size to be huge. The files for this toolkit has been compressed and split into three archive files. The three files have a total size of 7 GB. The three files shall be downloaded into the same folder to be extracted. In other words, you will need an additional 7 GB or more to get the extracted files. So we are looking at no less than 14 GB of free hard disk space required to complete the task. Do note that the extracted files are all we need.

I have not the hard disk space to even download the files hence has not tried out. Those that have extracted the files could let us know how much space is required to extract the files.

Expiry Date

Another thing to take note is the expiry date of the VPC image. The Microsoft Dynamics AX 2009 CTP3 license in the VPC image will expire on August 31, 2008. The Windows of the VPC image on the other hand will expire on June 6, 2009.

What is in the VPC Image?

Apart from the Pre-Release version of Microsoft Dynamics AX 2009, there is a wealth of software installed and properly configured in the VPC image. Some of them are its pre-requisite whereas the rest are required to demonstrate the complete set of Microsoft Dynamics AX 2009 functionalities.

You will also find Microsoft Office Ultimate 2007, Microsoft Office Sharepoint Server 2007, Microsoft Silverlight, Microsoft Office Visio Professional 2007, Microsoft SQL Server 2005, and Microsoft Visual Studio 2008 Professional just to name a few. The complete list is available on its user guide.

Recommended Laptop Requirement

This demonstration toolkit is designed to allow us to perform demo to prospects. We are expected to run it on our laptop. I would like to note the system requirement for the computer that host the VPC image. Companies purchasing laptops for their team members could take the following into consideration.

ProcessorPentium 4 with 1.2 GHz processor or higher
RAM2 GB minimum, 4 GB recommended
Hard disk space30 GB minimum

Final Thoughts

I guess it is good to get our hands on Microsoft Dynamics AX 2009 if we have the capacity. Those that has not the luxury of Microsoft Dynamics AX 5 CTP3 installer should really find ways to get this Demonstration Toolkit to work. Although it is intended for demonstration, it is a completely working package.

My experience performing demonstration with the VPC image from Microsoft Dynamics AX 4.0 SP1 Toolkit has not been very pleasant. This should be due to my laptop not meeting the requirement stated above. It requires quite a bit of patience.

Service Log on Account - Local System, Network Service or Domain User Account

March 25, 2008

Service Log On account is an important yet often overlook configuration. Just as the account you login to your windows workstation determines your authority over resources, the service log on account defines what the service is capable of accessing.

Windows Service

Windows Services are long-running executable applications that run in their own Windows sessions. They are designed not to require user intervention hence do not show any user interface. Those working with Microsoft Dynamics Ax actually work directly with a few Windows Services. The Application Object Server (AOS) of Microsoft Dynamics Ax is implemented as a Windows Service. The database server be it Microsoft SQL Server or Oracle runs as Window Service.

You will find the list of Window Services installed on your computer from the Services Management Console. It is found under Administrative Tools > Services. The following image shows the Services Management Console.

Services Windows Management Console

Log On Account

When we configure a distributed system with Windows Services, Service Log On account is one thing we should pay ample attention to. We do not usually spend effort on this for a standalone all-in-one installation we usually have in our laptop for demo and some development. When the pieces of the software are installed over a few servers however, there will be resources over the network that we need the Windows Service to access.

Microsoft Dynamics Ax AOS for example could be installed on a separate server from the Application files. This is a common model in production environment where more than one AOS is necessary. In this case, the Service Log On Account for these AOS will need rights to the application files over the network. On top of that, the AOS gains access to the database server using this credential too. The rights over database objects are determined by this Log On account.

Apart from that, we would not want these services to interfere with resources within the server itself for security reason. Services for information system such as those database servers are rather prone to attack. It is important that the account that starts this type of Windows Service has sufficient rights over the resources it requires and no more than that.

The following figure illustrates an example of Service Log On Account setting. This is found on the Log On tab of the Service Property dialog box.

Service Property Page - Log On Tab

Account Options

You may choose among three types of accounts to start a Windows Service; the Local System Account, the Network Service Account, or a dedicated Domain User Account.

Local System Account

The local system account is a Windows operating system account that has full administrative rights on the local computer but has no network access rights. If your Windows Service interacts with network resources, this account is not an option. Moreover, this account has too many privileges on local computer. It is not recommended for use with Windows Services we are dealing with.

Network Service Account

The Network Service account is a special built-in system account that is similar to an authenticated user account. This account has the same level of access to system resources and objects as other members of the Users group. Services that log on under this account will use the credentials of the computer account to access network resources. This includes accessing database. You have the option to set database access rights using computer account only.

Apart from the issue in defining database access, this account has too many privileges for the services we are discussing here since it inherits the rights from the Users group.

Domain User Account

Domain user account is an account we create manually in the Active Directory. Privileges could be configured exactly to our needs. We may define resources rights across servers. We could even configure database access specific to the need of the Windows Service.

If we have multiple instances of Dynamics Ax AOS serving different purposes for example, we may have different accounts for the AOS services. This allows us to give rights to the correct set of application files and database only. We will not have to worry even if different teams of people are working on the instances.

This is the most widely used account for starting such service under production environment. It fulfills the requirement of giving all the rights required and not more.

Conclusion

Decision on what account to use very much depends on the environment. However, the general rule of thumb is to have domain user account for services such as Dynamics Ax AOS, SQL Server, SQL Server Agent, etc. in production environment. The flexibility and independence of this account type is helpful.

When you assign a user account to start a Windows Service, additional rights required for this purpose are assigned automatically. This is the case for Dynamics Ax AOS service. SQL Server services on the other hand require more setting than other services. The Log On account for them should be assigned during installation or through the SQL Server Configuration Manager in order to have those setting performed.

Run External Application from Dynamics Ax

March 20, 2008

Calling up external program from Dynamics Ax can be something very interesting to audience during introductory training and demo. Once in a while, I will encounter associates asking if it is possible to run external program, open word document, open a URL in an external browser, etc. from within Dynamics Ax. Usually they will show a sign of immense enthusiasm when I show them how it is achieved. It is like their imagination is exploring all sort of creative ways to make use of this facility.

The interesting part is that executing external application is fairly effortless in Dynamics Ax. X++ is capable of calling Microsoft Windows Application Programming Interface (API). The common functionalities of the Win API have been built in classes WinAPI, WinAPIServer, WinGDI and WinInet. Running external application could be achieved through the static method WinAPI::shellExecute.

Static Method WinAPI::shellExecute

This method takes six parameters where five of them are optional parameters. The following code segment shows the interface of this method.

client static int shellExecute(
    Filename _lpFile,
    str      _lpParameters      = '',
    str      _lpDirectory       = '',
    str      _lpOperation       = #ShellExeOpen,
    int      _show              = #SW_SHOWNORMAL,
    boolean  _waitForCompletion = false
    )

The interface might look complicated but the first parameter is usually all we need to assign. It is sufficient to achieve most of the scenarios. The second parameter allows us to execute an executable with parameters. We will look at examples where this second parameter comes into play later.

Class SysShellExecute

The class SysShellExecute facilitates calling WinAPI::shellExecute. This class has a main method that call the method WinAPI::shellExecute using args.parm() as the first parameter. This enables WinAPI::shellExecute to be called from menu item with ease. This is important Dynamics Ax bring up windows through menu item. Menu item works with buttons with ease.

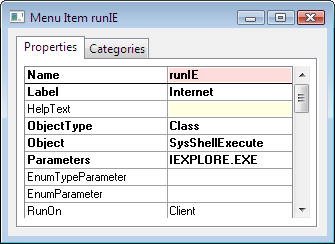
The following figure shows the property dialog of a menu item using SysShellExecute. The menu item shown will open an Internet Explorer browser when executed.

SysShellExecute Menu Item Property

Opening a File or URL

You shall not encounter any issue running application with class SysShellExecute. However, I have received enquiry when it comes to opening a file or a URL. I do not want to go into the ways they have tried. Basically opening file and URL are equally simple.

1. Default Application

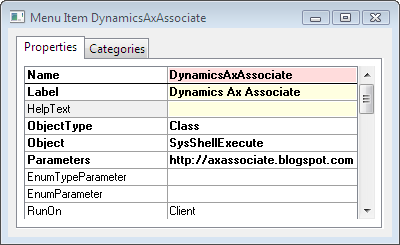
Windows has associated different file type to a default application. We just need to execute the file name in order to open that file with the default application. The following figure shows the property page of a menu item that opens the website Dynamics Ax Associate in the default browser.

Open URL with SysShellExecute Menu Item

2. Specific Application

The previous approach opens the file or URL in the default application. There are cases where you need to specify the application to open the file with. You may achieve this with static method WinAPI::shellExecute.

Let say the default browser for your computer is FireFox and the website you are opening requires Internet Explorer. You may use the following code to open the URL with Internet Explorer.

WinAPI::shellExecute("IEXPLORE.EXE",
    "http://axassociate.blogspot.com");

Conclusion

The examples given above cover the execution of Windows Internet Explorer and opening of URL. They work similarly with a Word Document, Excel Spreadsheet, etc.

Report with Sum at Header using Duplicated Query

March 15, 2008

Your report needs the summation of some fields at the Header portion but you do not want to hack the report classes to achieve that.

Dynamics Ax subtotal is available only at the footer. If you need it in some other section, you would have to find a way around. We will look at an approach where the report query is duplicated for the necessary calculation at the section header.

The demo subsequently will produce the report illustrated in the following figure. The section footer is the subtotal produced by the standard report. The section header on the other hand shows the output of the approach suggested.

Dynamics Ax Report with Sum at Header

Motivation

There are ways to achieve this. The use of duplicated query is motivated by the following factors.

  • It could be applied to existing report without affecting the overall structure. In other words, no changes will be required on the data source and other sections in the report.
  • The calculation is in accordance to the filters set by the user without additional work.
  • The report query will be handled by Dynamics Ax report subsystem while we will only work on the duplicated copy of the query.

Technique Highlight

Basically we will have two copy of the same query. At the section group header, we will loop the duplicated copy until the next header group is reached. The necessary work is performed while we loop and the value to be shown at the group heading is prepared prior to executing the group header. Then the report subsystem will take over and loop the original copy of the query.

The following code segment illustrates the technique explained above.

// loop as long as within the same subheading group.
do {
  custTransLoop = qrHead.get(custTransLoop.TableId);
  if (custTransLoop.AccountNum == CustTrans.AccountNum) {
    rSum += custTransLoop.AmountCur;
  }
  else {
    break; //heading group changed.
  }
} while (qrHead.next());

mrSum = rSum; //value prepared for heading.

super(); //execute group heading.

The following code segment illustrates how the report query is duplicated into a QueryRun object.

qrHead = new QueryRun(element.query());

Demo

We will create a simple report with CustTrans as the only data source to demonstrate the highlighted approach. We dissect the whole process into three sections. The first will cover creating report while the second is regarding adding subtotal just to verify the outcome of the calculation. The final section is the one that cover the approach recommended. Those that are well versed with Dynamics Ax reporting tool may opt to skip the first two sections.

Create Report

The following steps cover report creation. Alternatively, you may use the Report Wizard to perform this.

  1. Create a new project to group objects if you have not.
  2. Right click on your project and select New > Report. You will have a report with the name Report1 created.
  3. Right click on Data Sources > Query > Data Sources and select New Data Source. Change the Table to CustTrans under the Property Page.
  4. Expand the node CustTrans(CustTrans) and right click on the node Sorting. Select New > Field. Ensure the Field is AccountNum. Change the properties AutoHeader and AutoSum to Yes.
  5. Right click on the Designs node and select New Report Design. You will see a new node named ReportDesign1 with a child node named AutoDesignSpecs.
  6. Right click on ReportDesign1 and select Generate Design. You will see a node named Generated Design added. You will also see a node named Section Group: CustTrans too.
  7. Expand the Section Group: CustTrans and right click on Body:CustTrans_Body. Select New Control > Field Group from CustTrans. Change the field group's DataGroup property to AutoReport.

Validation preparation

The following steps add a subtotal to a field for verification.

  1. Change the AutoFieldGroupOrder property to "Save the fields' properties" for the field group.
  2. Expand the Group and find control named Real: CustTrans_AmountCur and change the SumAll property to Yes.
  3. Right click on Footer: CustTrans_Footer and select New Control > Sum. Change the properties of the newly added for Table to CustTrans and Field to AmountCur.

Sum at Header

You now have a report with subheading. The following steps demonstrate the approach mentioned earlier.

  1. Add the following declaration to classDeclaration of the report. The classDeclaration will now look like the following.
  2. public class ReportRun extends ObjectRun
    {
      AmountCurDebCred  mrSum;
      QueryRun          qrHead;
    }

  3. Add a new method to Header: CustTrans_Header and copy the following code to it.
  4. display AmountCurDebCred SumAmtCur()
    {
      return mrSum;
    }

  5. Then add a new a control with the display method to the Header. This could be done by dragging the method and dropping it at the Header: CustTrans_Header node.
  6. Override the method executeSection() of the header with the following code. The method CustTrans_Header:executeSection() shall looks like the following.
  7. public void executeSection()
    {
      CustTrans  custTransLoop;
      real       rSum;

      // dupplicate the query on first execution of the header.
      if (!qrHead) {
        qrHead = new QueryRun(element.query());
        qrHead.next();
      }

      // loop as long as within the same subheading group.
      do {
        custTransLoop = qrHead.get(custTransLoop.TableId);
        if (custTransLoop.AccountNum == CustTrans.AccountNum) {
          rSum += custTransLoop.AmountCur;
        }
        else {
          break;
        }
      } while (qrHead.next());

      mrSum = rSum; //prepare value to be shown at group header.

      super(); //execute the group header.
    }

X++ Bitwise Operators

January 30, 2008

Bitwise operations are performed at the individual bits. In other words, the value is converted into binary format and the bitwise operators will act on each and every digit.

Bitwise operation is not very widely used in business solution development. The only time I remember using one was to track a series of states. The advantage is the set of states (true or false) could be altered in one operation. However, readability is not good.

Dynamics Ax provides a set of operators to perform such operation. They will be discussed subsequently. The examples you will find subsequently are base on 32-bit integers. The rest of the operators are Arithmetic and Assignment Operators, and Relational Operators.

& (AND)

This operator performs a binary AND on two expressions.

Syntax

expression1 & expression2

Example

print 10 & 8; //1010 AND 1000
pause; // 1000 -> 8

| (OR)

This operator performs a binary OR to two expressions.

Syntax

expression1 | expression2

Example

print 10 | 8; //1010 OR 1000
pause; // 1010 -> 10

^ (XOR)

This operator performs a binary XOR to two expressions.

Syntax

expression1 ^ expression2

Example

print 10 ^ 8; //1010 XOR 1000
pause; // 0010 -> 2

~ (NOT)

This operator performs a bitwise NOT to the expression on the right.

Syntax

~ expression

Example

print ~10; //NOT 1010
pause; // 11111111111111111111111111110101 -> -11

<< (Left Shift)

This operator requires two operands. Expression on the right specifies the number of bits to shift. A left shift takes the number of bit specified from the left and moves it to the right.

The common use of left shift is to multiply an integer by a power of 2. The syntax is equivalent to expression1 * 2 expression2.

Syntax

expression1 << expression2

Example

print 123 << 3; // 00000000000000000000000001111011 << 3
pause; // 00000000000000000000001111011000 -> 984

>> (Right Shift)

This operator is a reverse of Left shift. It also requires two operands and the expression on the right denotes the number of bits to shift. The different is that it will shift the bits from the right to the left instead.

Syntax

expression1 >> expression2

Example

print 984 >> 3; // 00000000000000000000001111011000 << 3
pause; // 00000000000000000000000001111011 -> 123

X++ Relational Operators

January 15, 2008

The relational operators are frequently used in conditional statements and the where clause of data manipulation statements. Other operators could be found in Arithmetic and Assignment Operators.

like

This operator compares two expressions with wildcards. It is used to evaluate the pattern of an expression. You use * as a wildcard for zero or more characters. The wildcard ? will represents any single character. This is similar to the Criteria Format discussed in Filtering Record in Dynamics Ax.

This operator returns true if the expression on the left matches the pattern supplied on the right. Otherwise, it returns false.

Syntax

expression like pattern

Example

str sExp = "Dynamics Ax associate";
;
print sExp like "*nam??s*ate"; // Output 1 - True
pause;

== (equal)

This operator compares two expressions for difference. It returns true if they are identical and false if they are different.

Syntax

expression1 == expression2

Example

str sExp = "Dynamics Ax associate";
;
print sExp == "*nam??s*ate"; // Output 0 - False
pause;

!= (not equal)

This operator is the opposite of the equal operator. It also compares two expressions for difference. However, it returns true if they are different and false if they are identical.

Syntax

expression1 != expression2

Example

str sExp = "Dynamics Ax associate";
;
print sExp != "*nam??s*ate"; // Output 1 - True
pause;

>=

This operator returns true if expression on the left is greater than or equal to expression on the right.

Syntax

expression1 >= expression2

Example

str sExp = "Dynamics Ax associate";
;
print sExp >= "Dynamics Ax"; // Output 1 - True
pause;

<=

This operator returns true if expression on the left is less than or equal to expression on the right.

Syntax

expression1 <= expression2

Example

str sExp = "Dynamics Ax associate";
;
print sExp <= "Dynamics Ax"; // Output 0 - False
pause;

>

This operator returns true if expression on the left is greater than the expression on the right.

Syntax

expression1 > expression2

Example

int nVar = 30;
;
print nVar > 30; // Output 0 - False
pause;

<

This operator returns true if expression on the left is less than the expression on the right.

Syntax

expression1 < expression2

Example

int nVar = 30;
;
print nVar < 30; // Output 0 - False
pause;

&& (AND)

This operator returns true if both expressions beside the operator is true. It returns false if either of the expression or both expressions are false.

Syntax

expression1 && expression2

|| (OR)

This operator returns true if either of the expressions beside the operator is true as well as when both of the expressions are true. It returns false only if both of the expression are false.

Syntax

expression1 || expression2

! (Not)

This operator takes one expression on its right. It negates the expression on its right. In other words, it returns false if the expression is true and returns true if the expression is false.

Syntax

! expression

X++ Operators - Arithmetic and Assignment

January 12, 2008

Every programming language has a set of operators. They are used almost everywhere in code. They form the foundation for building functionalities. Dynamics Ax associate believes it is helpful to know what is offered in X++.

This post will cover the arithmetic and assignment operators. In the discussion, you will find the word expression. The expression here could be as simple as a number or a combination of various variables, operators, etc.

=

This operator assigns the result of expression to the right to the variable on the left. It is called the assignment operator.

Syntax

variable = expression

Example

int nVar = 2;
;
nVar = 12 - 3;
print nVar; // nVar is now 9.
pause;

?

This is called the ternary operator because it requires three expressions. The expression on the left is a condition. It will result in either true or false. The two expressions on the right separated by a colon are the result of the operation. If the condition is true, the expression on the left of the colon is returned. Otherwise, expression on the right of the colon is returned instead.

Syntax

expression1 ? expression2 : expression3

Example

int nVar = 2;
;
print nVar < 3 ? nVar + 1 : nVar - 1; // print output 3.
pause;

+=

This operator combines an arithmetic addition with an assignment operator. This operator assigns the current value of the variable to the left plus the expression on the right back to the variable on the left.

Syntax

variable += expression

Example

int nVar = 2;
;
nVar += 12 - 3;
print nVar; // nVar is now 11.
pause;

-=

This operator combines an arithmetic deduction with an assignment operator. This operator assigns the current value of the variable to the left minus the expression on the right back to the variable on the left.

Syntax

variable -= expression

Example

int nVar = 2;
;
nVar -= 12 - 3;
print nVar; // nVar is now -7.
pause;

++

This operator is used to increase a variable by one. Although this could be achieve with of other operators but this operator produces cleaner code.

Syntax

variable ++

Example

int nVar = 2;
;
nVar ++;
print nVar; // nVar is now 3.
pause;

--

This operator is used to decrease a variable by one.

Syntax

variable --

Example

int nVar = 2;
;
nVar --;
print nVar; // nVar is now 1.
pause;

+ (Plus)

This operator performs addition of two expressions.

Syntax

expression1 + expression2

Example

print 3 + 2; // Print output 5.
pause;

- (Minus)

This operator performs subtraction of expression on the right from expression on the left.

Syntax

expression1 - expression2

Example

print 3 - 2; // Print output 1.
pause;

* (Multiply)

This operator multiplies two expressions.

Syntax

expression1 * expression2

Example

print 3 * 2; // Print output 6.
pause;

/ (Divide)

This operator divides expression on the left with expression on the right.

Syntax

expression1 / expression2

Example

print 3 / 2; // Print output 1.5.
pause;

DIV

This operator performs integer division on expression on the left by expression on the right.

Syntax

expression1 DIV expression2

Example

print 5 DIV 2; // Print output 2.
pause;

MOD

This operator returns the remainder of an integer division of expression on the left by expression on the right.

Syntax

expression1 MOD expression2

Example

print 5 MOD 2; // Print output 1.
pause;

Dynamics Ax Gives Profile Tyrecenter Competitive Advantage

December 24, 2007

Profile Tyrecenter Logo

Profile Tyrecenter is a leading provider of tires, wheels and automotive maintenance services to large fleet hire and trucking companies in Belgium, Luxembourg and the Netherlands. They operate on a franchising model. They have adopted Microsoft Dynamics Ax to help them connects with suppliers and customers. Microsoft Dynamics has help streamline sales, logistics, finance, supply chain management (SCM), and marketing process.

Check out the following video. The case is presented by the Managing Director and CIO of Profile Tyrecenter. Note comments on SAP near the end.


If you prefer to read the case instead of watching it, you may download Tire Specialist Gains Competitive Edge with Centralized Business Management Solution from Microsoft Customer Evidence. Those that could read Profile Tyrecenter official website could provide us with more info.

Box: Dynamics Ax Message Box

December 23, 2007

There are scenarios where the system requires prompt user attention. The system may require decision from the user before proceeding, or having to inform the user of something important. This is usually done by freezing the application forcing the user to interact with a child window. This child window is known as a modal window.

An example could be found when you close a window after modifying the record. You will see a dialog box asking you whether you want to save changes. The following figure shows the window we are referring to.

Save changes reminder dialog box

Those experienced with other development platform might have searched for message box. In Dynamics Ax, this is achieved with the class Box. You may find it at AOT > Classes > Box. The methods to call various types of modal dialog boxes are visible.

Type 1: Notify user

This group produces a dialog box with an OK button. They are mainly used to notify user of something. There are three dialog boxes in this group with different icon; information, warning and error. The following are the three methods that produce this type of box. This is followed by a figure that shows a sample of such dialog box.

  1. box::info(str _text[, str _title, str _bottomText])
  2. box::warning(str _text[, str _title, str _bottomText])
  3. box::stop(str _text[, str _title, str _bottomText])
Dynamics Ax Box::info

Type 2: Detail Information Notification

This type of dialog box is meant to provide detail information. There is an option to provide link to further information. There is also an option to not show the dialog again.

There are two methods that produce such dialog box. The second one is an extended version of the first where the ability to define caption is available.

  1. box::infoOnce(str heading, str information, URL helpURL, str owner)
  2. box::infoOnceEx(str _heading, str _information, URL _helpURL, str owner, str caption, boolean _detach)
Box::infoOnce

Type 3: Request for Decision

This group provides more than one buttons that require user decision. They come with various buttons combinations. The button combination is denoted in the method name. The most common are OK Cancel and No Yes.

There is one such dialog box that offers the option not to show the dialog box again. It is a dialog box with Yes and No button plus a Do not ask again checkbox. This is achieved with the method box::yesNoOnce.

The following are the list of methods which also denotes their button combination. This is followed by a figure showing a sample of such dialog boxes.

  1. box::yesAllNoAllCancel(str _text, DialogButton _defaultButton [, str _title])
  2. box::yesNoAllNoCancel(str _text, DialogButton _defaultButton [, str _title])
  3. box::yesNoAxaptaForm(str _text, DialogButton _defaultButton [, str _title])
  4. box::yesNoCancel(str _text, DialogButton _defaultButton [, str _title])
  5. box::yesNoOnce(str _title, str _text, DialogButton _defaultButton, str _owner)
  6. box::yesYesAllNoCancel(str _text, DialogButton _defaultButton [, str _title])
Box::yesNoAllCancel

Summary

The message box facility in X++ is fairly well done. The parameters are self descriptive. We are offered up to date feature such as the Do not ask again checkbox. In case there are more types required, the class Box could be easily extended to provide more choices.

Break and Continue

December 21, 2007

Break and continue keywords help control the flow of execution. They could be used everywhere in the code. However, they are commonly used in loops and switch statements because that is where they are most needed.

Similarity and Difference

Basically both break and continue are very much similar. They both tell the compiler to skip the rest of the code. How much code is skipped depends on where it is used. When used within a switch statement or the three loops, only code within the structure is affected. Otherwise, the whole method will be affected.

The difference appears when used within a loop. In a loop, continue will skip the rest of the loop and continue running the next loop. If break is used instead, the whole loop will be abandoned. Execution will continue after the loop.

Switch statement

Break is commonly seen in switch statement. The switch statement in X++ is similar to those of C language. Execution begins at the case node that fulfils the criteria until the end of the switch structure. A break keyword is used to stop executing the rest of the structure.

The objective here is to stop executing the rest of the code within the switch statement. Base on the behavior of two statements discussed above, using continue here will just produce the same result.

While Loop, Do While Loop and For Loop

This is where a choice between the two statements will make a different. The following code segment demonstrates the effect of keywords break and continue in a loop.

The code segment prints the even number within 1 to 10. The do while loop here is an infinite loop. The keyword break is used to end the loop when exit condition is fulfilled. The keyword continue is used to decide whether to execute the rest of the loop which in turn prints the number.

int nCtr;
;
// print even number from 1 to 10.
do {
    nCtr ++;

    // ends loop if exceeded 10.
    if (nCtr > 10) {
        break;
    }

    // do not print the number if not even.
    if (nCtr mod 2) {
        continue;
    }

    print nCtr;
} while(1);

Method Exit Point

There is a common practice to exit a method in the middle for methods that returns a value. This is less seen in void methods. The keywords break and continue could be used to achieve this for void methods.

Configure Dynamics Ax Global Search

December 17, 2007

This feature is not one of those that are well hidden. It has taken over the shortcut key Ctrl+F that used to call up the Filter by field dialog box. You might even have accidentally brought up this attractive feature during system demo. However it does not work out of the box. Let us look at the configuration required

Dynamics Ax Global Search is new feature added to the task pane in Dynamics Ax 4.0. It enables users to search for information without specifying the table and field as opposed to conventional search. Although the name global, it is not as global as you might first thought. The keyword entered is searched through fields across tables you selected only.

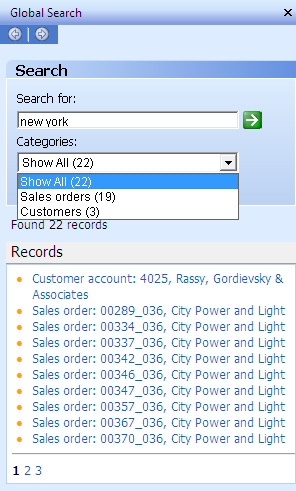
Dynamics Ax Global Search Task Pane

The Global Search Task Pane could be brought up in three ways. You could do it by clicking on the Binocular button on the tool bar, selecting the menu Edit > Find, or by pressing the shortcut key Ctrl + F.

The figure on the right illustrates a Global Search pane with result from the keyword "new york". The Categories combo box allows the user to see results from specific tables only. Clicking on the result would open the form of the designated record with the row focused.

Configuration Procedure

There are two components relevant to this feature. You may find both under menu Basic > Setup > Data Crawler. They are Table Setup and Data Crawler Setup. The former defines the table that you would like searchable within Dynamics Ax Global Search. The latter is the crawler that would build up the search index. Search will be performed on this index and not on the actual data itself.

1. Table Setup

This form is found at the main menu Basic > Setup > Data Crawler > Table Setup. This is where you specify the table that you would like searchable under Dynamics Ax Global Search. The following figures show the Table Setup form.

Global Search - Table Setup

Dynamics Ax - Global Search - Table Search - Text Index

The Incremental checkbox you find on Overview tab indicates that indexing would be done for newly modified record only. This is only applicable for tables with modified date field. It is automatically checked if the table has the field. You are not given an option to check or uncheck this field.

In the tab Text index, you will find the fields added for indexing as well as two columns named Updated date and Updated time. They indicate when is the last time an index has been built for that table. They have impact on tables with Incremental checked. If you add a new field for text indexing after the table has been indexed, the added field will not be indexed until the data is modified. You will have to recreate index to have the field searchable. Recreating index is discussed shortly.

Tables without incremental checked will not face this problem. You may add a field for indexing anytime. The data crawler will pick it up during it subsequent scheduled crawl.

Global Search - Table Setup - Add all field

When you add a new table to the list, you will see a dialog box like the one shown above. The system will ask you whether you want to add all text fields to text index. While this facility eases the setup, it could cost some performance running under production environment. Understanding the intention of Global Search for the company and configuring accordingly is advisable.

2. Data Crawler Setup

You could find Data Crawler setup in Basic > Setup > Data Crawler > Data Crawler. This form is use to configure and manage the state of Data Crawler for each company. The following figure shows the Data Crawler Setup form.

Global Search - Data Crawler

You will get the message “The search indexing engine is not started” for every single search you perform if Data Crawler is not started. The result will still be shown but information might not be up to date. This is where you start the data crawler if it is not configured to start automatically.

You may also set the Data Crawler to start automatically. You do so by checking the Start crawler automatically checkbox in this form. You may define the speed of indexing. The speed settings and the description of the amount of resources it will consume are included in the Crawler speed combo box.

This is the place to recreate index too. We have touched one scenario where re-indexing is required in the previous section. You just have to check the Recreate index checkbox prior to starting crawler to rebuild index.

The option to run crawler in foreground is available from here too. This is done by deselecting the Run in background checkbox. However, I have not found a use for this option as starting the crawler with this option will freeze the Dynamics Ax client. Please let us know if you have found the use of this option.

Final Thoughts

When it comes to data search that spans tables, security control is always a concern. This particular feature has to comply with User Group Permissions and Record Level Security to be useful.