Dynamics Ax Gives Profile Tyrecenter Competitive Advantage

December 24, 2007

Profile Tyrecenter Logo

Profile Tyrecenter is a leading provider of tires, wheels and automotive maintenance services to large fleet hire and trucking companies in Belgium, Luxembourg and the Netherlands. They operate on a franchising model. They have adopted Microsoft Dynamics Ax to help them connects with suppliers and customers. Microsoft Dynamics has help streamline sales, logistics, finance, supply chain management (SCM), and marketing process.

Check out the following video. The case is presented by the Managing Director and CIO of Profile Tyrecenter. Note comments on SAP near the end.


If you prefer to read the case instead of watching it, you may download Tire Specialist Gains Competitive Edge with Centralized Business Management Solution from Microsoft Customer Evidence. Those that could read Profile Tyrecenter official website could provide us with more info.

Box: Dynamics Ax Message Box

December 23, 2007

There are scenarios where the system requires prompt user attention. The system may require decision from the user before proceeding, or having to inform the user of something important. This is usually done by freezing the application forcing the user to interact with a child window. This child window is known as a modal window.

An example could be found when you close a window after modifying the record. You will see a dialog box asking you whether you want to save changes. The following figure shows the window we are referring to.

Save changes reminder dialog box

Those experienced with other development platform might have searched for message box. In Dynamics Ax, this is achieved with the class Box. You may find it at AOT > Classes > Box. The methods to call various types of modal dialog boxes are visible.

Type 1: Notify user

This group produces a dialog box with an OK button. They are mainly used to notify user of something. There are three dialog boxes in this group with different icon; information, warning and error. The following are the three methods that produce this type of box. This is followed by a figure that shows a sample of such dialog box.

  1. box::info(str _text[, str _title, str _bottomText])
  2. box::warning(str _text[, str _title, str _bottomText])
  3. box::stop(str _text[, str _title, str _bottomText])
Dynamics Ax Box::info

Type 2: Detail Information Notification

This type of dialog box is meant to provide detail information. There is an option to provide link to further information. There is also an option to not show the dialog again.

There are two methods that produce such dialog box. The second one is an extended version of the first where the ability to define caption is available.

  1. box::infoOnce(str heading, str information, URL helpURL, str owner)
  2. box::infoOnceEx(str _heading, str _information, URL _helpURL, str owner, str caption, boolean _detach)
Box::infoOnce

Type 3: Request for Decision

This group provides more than one buttons that require user decision. They come with various buttons combinations. The button combination is denoted in the method name. The most common are OK Cancel and No Yes.

There is one such dialog box that offers the option not to show the dialog box again. It is a dialog box with Yes and No button plus a Do not ask again checkbox. This is achieved with the method box::yesNoOnce.

The following are the list of methods which also denotes their button combination. This is followed by a figure showing a sample of such dialog boxes.

  1. box::yesAllNoAllCancel(str _text, DialogButton _defaultButton [, str _title])
  2. box::yesNoAllNoCancel(str _text, DialogButton _defaultButton [, str _title])
  3. box::yesNoAxaptaForm(str _text, DialogButton _defaultButton [, str _title])
  4. box::yesNoCancel(str _text, DialogButton _defaultButton [, str _title])
  5. box::yesNoOnce(str _title, str _text, DialogButton _defaultButton, str _owner)
  6. box::yesYesAllNoCancel(str _text, DialogButton _defaultButton [, str _title])
Box::yesNoAllCancel

Summary

The message box facility in X++ is fairly well done. The parameters are self descriptive. We are offered up to date feature such as the Do not ask again checkbox. In case there are more types required, the class Box could be easily extended to provide more choices.

Break and Continue

December 21, 2007

Break and continue keywords help control the flow of execution. They could be used everywhere in the code. However, they are commonly used in loops and switch statements because that is where they are most needed.

Similarity and Difference

Basically both break and continue are very much similar. They both tell the compiler to skip the rest of the code. How much code is skipped depends on where it is used. When used within a switch statement or the three loops, only code within the structure is affected. Otherwise, the whole method will be affected.

The difference appears when used within a loop. In a loop, continue will skip the rest of the loop and continue running the next loop. If break is used instead, the whole loop will be abandoned. Execution will continue after the loop.

Switch statement

Break is commonly seen in switch statement. The switch statement in X++ is similar to those of C language. Execution begins at the case node that fulfils the criteria until the end of the switch structure. A break keyword is used to stop executing the rest of the structure.

The objective here is to stop executing the rest of the code within the switch statement. Base on the behavior of two statements discussed above, using continue here will just produce the same result.

While Loop, Do While Loop and For Loop

This is where a choice between the two statements will make a different. The following code segment demonstrates the effect of keywords break and continue in a loop.

The code segment prints the even number within 1 to 10. The do while loop here is an infinite loop. The keyword break is used to end the loop when exit condition is fulfilled. The keyword continue is used to decide whether to execute the rest of the loop which in turn prints the number.

int nCtr;
;
// print even number from 1 to 10.
do {
    nCtr ++;

    // ends loop if exceeded 10.
    if (nCtr > 10) {
        break;
    }

    // do not print the number if not even.
    if (nCtr mod 2) {
        continue;
    }

    print nCtr;
} while(1);

Method Exit Point

There is a common practice to exit a method in the middle for methods that returns a value. This is less seen in void methods. The keywords break and continue could be used to achieve this for void methods.

Microsoft SQL Server Orphaned User

December 20, 2007

You have been logging in to SQL Server with a user name only to get Microsoft SQL Server, Error: 18456 one day. You verified that it is a valid user in the database you want to access.

Orphaned User is a term use to describe a condition where a database user does not have a properly defined SQL Server login. As discussed in SQL Server Login and Database User, the mapping of SQL Server login to a Database User is stored within the user database. The mapping information includes the name and the SID of the corresponding SQL Server login.

Orphaned user appears when a database user does not have a SQL Server login of the same name, or having SQL Server login with the same name but different SID. The most common cause is restoring or attaching a database to a different instance of SQL Server. User can also become orphaned when the corresponding SQL Server login is deleted (dropped in SQL Server terminology).

How to Identify

Basically you shall suspect a possibility of orphaned user when you cannot login to the database with the login you usually do or one that you are sure is valid. You may verify by looking at the database user property. The following figures show the property of proper database user and orphaned database user. Notice that the orphaned user is without a login.

MS SQL Server Database User Property Page

MS SQL Server Orphaned User Propery Page

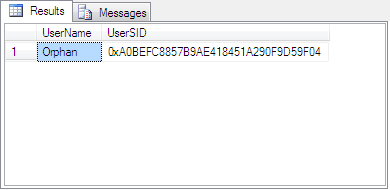
There is a more technical way to detect orphaned user. You may run the procedure sp_change_users_login with the Action parameter Report on the database. You may execute it in Microsoft SQL Server Management Studio or any database client software. The script will return a list of orphaned user name and SID for the particular database. The following is the T-SQL script to detect orphaned user and the subsequent figure shows the result. The result pane would be blank if there is no orphaned user.

USE database_name
EXEC sp_change_users_login @Action='Report'

MS SQL Server Orphaned User List

Remember that user is at database level. You will get the list of orphaned user for the database you execute the previous script on only. That is why I have included the script to change database prior to executing the procedure sp_change_users_login.

How to Resolve

Orphaned user could be resolved fairly easily. You have to first find the login to be mapped to the orphaned user. You will create a new login if there is not one appropriate. Then map the intended login with the orphaned user.

1. Find or create Appropriate Login

The user name that you supplied to access the database server is a login. You should find a login similar to your user name. If you cannot find one, create a new login with the following script.

For windows login, CREATE LOGIN [Domain\User] FROM WINDOWS

For SQL Server login, CREATE LOGIN login_name WITH PASSWORD='password'

2. Map the Orphaned User to Selected Login

The following T-SQL script will do the job.

USE database_name
EXEC sp_change_users_login @Action='update_one', @UserNamePattern='orphaned user', @LoginName='selected login'

Final Thoughts

If you are not familiar with T-SQL scripts and find uncomfortable with the resolution above, there is a more “windows” way. However, this is provided your system does not enforce access rights at database level like Microsoft Dynamics Ax.

Such system will configure the user to hold certain fixed database role. Dynamics Ax for example, the user will have db_datareader, db_datawriter and db_ddladmin fixed database roles. You could find this on the Database User property page.

In order to resolve this using SQL Server Management Studio, you will have to first identify the database roles mentioned above. Then, drop the orphaned user. Finally, map the Login to the database from SQL Server Login property page under the User Mapping tab. You will set the database role on the same page.

Configure Dynamics Ax Global Search

December 17, 2007

This feature is not one of those that are well hidden. It has taken over the shortcut key Ctrl+F that used to call up the Filter by field dialog box. You might even have accidentally brought up this attractive feature during system demo. However it does not work out of the box. Let us look at the configuration required

Dynamics Ax Global Search is new feature added to the task pane in Dynamics Ax 4.0. It enables users to search for information without specifying the table and field as opposed to conventional search. Although the name global, it is not as global as you might first thought. The keyword entered is searched through fields across tables you selected only.
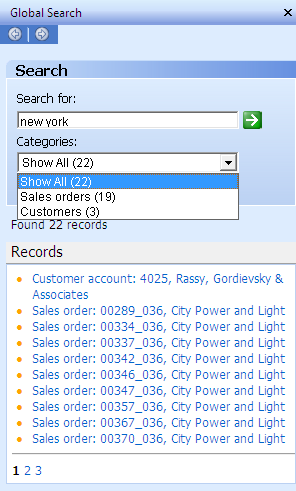
Dynamics Ax Global Search Task Pane

The Global Search Task Pane could be brought up in three ways. You could do it by clicking on the Binocular button on the tool bar, selecting the menu Edit > Find, or by pressing the shortcut key Ctrl + F.

The figure on the right illustrates a Global Search pane with result from the keyword "new york". The Categories combo box allows the user to see results from specific tables only. Clicking on the result would open the form of the designated record with the row focused.

Configuration Procedure

There are two components relevant to this feature. You may find both under menu Basic > Setup > Data Crawler. They are Table Setup and Data Crawler Setup. The former defines the table that you would like searchable within Dynamics Ax Global Search. The latter is the crawler that would build up the search index. Search will be performed on this index and not on the actual data itself.

1. Table Setup

This form is found at the main menu Basic > Setup > Data Crawler > Table Setup. This is where you specify the table that you would like searchable under Dynamics Ax Global Search. The following figures show the Table Setup form.

Global Search - Table Setup

Dynamics Ax - Global Search - Table Search - Text Index

The Incremental checkbox you find on Overview tab indicates that indexing would be done for newly modified record only. This is only applicable for tables with modified date field. It is automatically checked if the table has the field. You are not given an option to check or uncheck this field.

In the tab Text index, you will find the fields added for indexing as well as two columns named Updated date and Updated time. They indicate when is the last time an index has been built for that table. They have impact on tables with Incremental checked. If you add a new field for text indexing after the table has been indexed, the added field will not be indexed until the data is modified. You will have to recreate index to have the field searchable. Recreating index is discussed shortly.

Tables without incremental checked will not face this problem. You may add a field for indexing anytime. The data crawler will pick it up during it subsequent scheduled crawl.

Global Search - Table Setup - Add all field

When you add a new table to the list, you will see a dialog box like the one shown above. The system will ask you whether you want to add all text fields to text index. While this facility eases the setup, it could cost some performance running under production environment. Understanding the intention of Global Search for the company and configuring accordingly is advisable.

2. Data Crawler Setup

You could find Data Crawler setup in Basic > Setup > Data Crawler > Data Crawler. This form is use to configure and manage the state of Data Crawler for each company. The following figure shows the Data Crawler Setup form.

Global Search - Data Crawler

You will get the message “The search indexing engine is not started” for every single search you perform if Data Crawler is not started. The result will still be shown but information might not be up to date. This is where you start the data crawler if it is not configured to start automatically.

You may also set the Data Crawler to start automatically. You do so by checking the Start crawler automatically checkbox in this form. You may define the speed of indexing. The speed settings and the description of the amount of resources it will consume are included in the Crawler speed combo box.

This is the place to recreate index too. We have touched one scenario where re-indexing is required in the previous section. You just have to check the Recreate index checkbox prior to starting crawler to rebuild index.

The option to run crawler in foreground is available from here too. This is done by deselecting the Run in background checkbox. However, I have not found a use for this option as starting the crawler with this option will freeze the Dynamics Ax client. Please let us know if you have found the use of this option.

Final Thoughts

When it comes to data search that spans tables, security control is always a concern. This particular feature has to comply with User Group Permissions and Record Level Security to be useful.

Vertical Search: The Vertical Solution in Search Service

December 15, 2007

The phrases horizontal solution and vertical solution are fairly common among our friends in the field of Dynamics Ax. Do you know there is an equivalent in the Search Service Industry?

We have seen enterprise increasing interest in vertical solutions. Vertical solutions are supposed to fit their needs better. Less effort is expected to gain result.

In the search service industry, there is a similar trend emerging too. It is called vertical search. More and more such services are emerging in the World Wide Web. Are there really demands for such service?

Generic Search

When we talk about search engine, Google, Yahoo and Live.com naturally come across our mind. There are a lot of search engines on the Internet but these three are the most dominant. They account for more than 90% of search traffic.

These are horizontal search engines. Searches are performed across all domains. You use keywords to delimit your search result in order to increase its accuracy. If we want to find out how to configure warehouse in Dynamics Ax for example, we have to include both the phrases Dynamics Ax and warehouse configuration. Otherwise we might get warehouse configuration for other software system instead.

Vertical Search

Have you ever thought of searching the Internet with the keyword “configure warehouse” and you see only results in Dynamics Ax? On top of that, the search result is formatted in a way that is meaningful to the domain. The users would be able to focus on their objectives and browse results in the most convenient manner.

This is what vertical search tries to address from my point of view. In more general term, vertical search scoped the search in very specific area or niche, promising pin-point accurate result for your search and has the result layout in a manner that improves user experience (user friendly in software term).

User Experience

Being focused in one area enables the site to be designed in a more “intelligent” manner. We could have categorization relevant to the target field. We could even see the use of industry specific terms that could be confusing when used in a general site.

Sample Vertical Search Services

The following are a few vertical search services. Maybe you could give them a try and let everyone know if vertical search is for you.

1. Google image search searches only image and format the result with thumbnail preview capability.
Google Image Search

2. IT.com provides result for Information Technology Solution.
It.com search

3. retrevo focuses on consumer electronics.
retrevo.com search

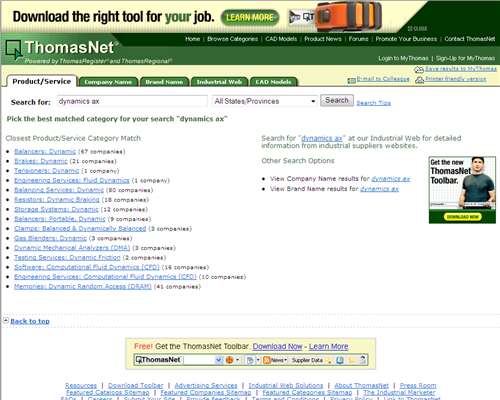
4. ThomasNet targets the manufacturing goods and services.
thomasnet search

5. Top Ten Wholesale provides search for wholesaler by merchandize.
Top Ten Wholesale search

Commercial Motivation

Some might be running such service for experiment or even as interest. However, there must be commercial motivation to support their existence and nurture them for prime time.

At first look, I see such service offering targeted advertising. Being highly targeted means less user is fine. Conversion rate would naturally be higher because you are supposedly talking to the right people.

Having said so, adoption is still an important factor. You may claim to have quality users producing extra high conversion rate but conversion rate is a percentage. 100% of one equals to 1% of 100. I am sure you sure you could do the math here.

The thing here is you should expect much less people using each of such service because they are vertical. They are created to serve only a portion of the Internet community.

Final Thoughts

Will you use the vertical search if there is one in your area of interest or work? I personally would wish a really wide coverage of my search result. I like the accuracy vertical search could offer but at the same time I would wonder if I am presented with all the information out there.

Development To-do List inside Dynamics Ax

December 14, 2007

I supposed most of us if not all keep a list of tasks to be performed. This list keeps us connected to our goals. It shows us steps to achieve our objectives. Some call this list the to-do list. Others call this the task list or even action items.

Task list is commonly used in solution development process as well. Solution development is about achieving goals in compliance with the principles of the software engineering discipline. The steps required could be complicated. Having a medium to keep everyone on track makes a different.

Dynamics Ax TODO

Microsoft Dynamics Ax has the to-do list built into its compiler. You write your to-do tasks in the code itself. Dynamics Ax will pick them up when it compiles the code. The list will be shown in the Compiler output window.

You add to-do by writing a single line comment or remark starting with the word TODO in uppercase. The following code segment shows the sample code for adding a task list entry. Please note that the word TODO has to be in uppercase. Removing this line of code will remove the entry from the task list.

void click()
{
    //TODO Make yourself happy.
}

The following figure shows an output of Dynamics Ax built in To-do list. Note that it is grouped by Application object and Method/Property. You may sort the list by such information. Double clicking on the entry will bring you to the exact location of that task. You will be presented with the code opened in the X++ Code Editor.

Dynamics Ax Compiler Output - Task

Rationale

What are the common actions you perform on a to-do list? Basically, you add new tasks to the list and remove items that are completed from the list. You may also sort and categorize items to make it more organized.

The to-do list in Dynamics Ax makes us add the reminder at the location most relevant. Categorization is automatically done base on the location of the note. Once we have completed the task, we are most likely at the exact location to remove the entry.

Possibilities

The following are three ways Dynamics Ax associate believes this feature could help in projects.

1. Extension to Project Task Tracking.

Dynamics Ax to-do list would be a great extension to your project task tracking. I believe most of the projects define development tasks to the level of feature description. It is tough to go more detail with external tools.

Tracking steps to construct a feature could be easily done with this tool. The activities and the to-do list are entirely integrated. You should not have the bottleneck that would occur when tracked to such level of detail externally.

2. Reminder for busy Developer

Dynamics Ax engineers could use this TODO as a reminder. It is common for developers to left something in the middle to attend to presumably more important tasks. You could easily leave a reminder with Dynamics Ax To-do.

3. Project Team Communication

The to-do list in Dynamics Ax is visible to everyone connecting to the same instance of Dynamics Ax. Project team members would be able to leave note of pending tasks for the rest to take note or follow up. It can also be used by senior team members to communicate guidelines to new team members. The guidelines could be embedded at the appropriate location inside the code itself.

I am sure there are more possibilities with some creativity. Those that have experience using this feature or with ideas are welcome to share with our fellow associates.

Base Enum without Default Value

December 12, 2007

Ever come across the need to capture enumerated data without the value filled in by default? We are going to look at two approaches and how they behave in different controls.

Enumerated data without default value here refers to fields with data type Base Enum that is not filled in when a new record is created. In other words, you would like the user to deliberately or implicitly select a value. The following figure shows a grid with new record. There are two columns both are of enumerated data type. The first column has no default value whereas the second has Normal as its default value.

Base Enum with and without default value

Approach #1: Blank Element Zero

One way to achieve this is to have the default element (value 0) configured with blank label. The following figure shows the setting for this approach. Element named “None” is the default element. Note that the label of this element is blank.

Base Enum with Blank Element Zero

This figure shows Base Enum FreightSlipType. You could see the corresponding field in Sales Order form. There is a field labeled Call tag type in the Delivery tab based on this Base Enum.

Approach #2: No Element Zero

The other way this is achieved is have no element with the value 0 in the Base Enum. The default value for an enumeration is zero. This will have the default value refers to none of the members of the enumeration.

The following figure shows a Base Enum with member elements starting from value 1. This Base Enum is created to illustrate this approach.

Base Enum with No Element Zero

Approach #1 vs Approach #2

I have created a form with the two methods of achieving no default value and a field with default value to show how they behave in different controls. The following figure shows the three types of Base Enum in three type of controls; combo box, radio button and list box.

Base Enum approach Comparison

In combo boxes, you see that both approaches started without a value. The drop down list for approach #1 (Call tag type) contains an empty line. This does not happen to the drop down list of approach #2 (No default). This means approach #1 enables the user to revert the value to empty but not the product of approach #2.

When the Base Enums are shown with radio button and list box, you will get an empty radio button and empty list entry respectively. Naturally, this does not affect radio button and list box based on approach #1.

Conclusion

Both approaches have their pros and cons. There are conditions where one is more suitable than the other.

Having blank element 0 produces a field that requires the user to choose a value and can be reverted to blank. This approach looks fine on a combo box but does not look good on radio button and list box. It is suitable for cases where it is optional.

Having no element 0 on the other hand produces a field that forces the user to pick a value. Once picked, the value cannot be reverted to blank. It can only be changed to some other value in the enumeration. This approach looks fine in all controls. It works very well to enforce mandatory field.

SQL Server Login and Database User

December 10, 2007

The terms login and user are often used interchangeably. However, they are used consistently to refer to two different things in Microsoft SQL Server context. In full, they are called SQL Server Login and Database User. Login is at server level whereas user is database level.

SQL Server Login

Login is meant for authentication. You provide a login to gain access to SQL Server. Having accessed the SQL Server does not mean having access to the databases. Some logins are given access to perform server level activities and has no access to database. Other users could be granted access to some of the databases hosted but not necessarily all.

In the Object Explorer of Microsoft SQL Server Management Studio, you will find login under Security > Logins. The following figure shows where login is located.

SQL Server Object Explorer Login Node

Database User

User on the other hand is used to provide access and determine permission on a database. This is database specific. The same login may have different set of permission for different database on the same server.

In the Object Explorer of Microsoft SQL Server Management Studio, you will find user under Database > [Database Name] > Security > Users. User is created by mapping a SQL Server login to a database. The following figure illustrates where user is found in Object Explorer.

SQL Server Object Explorer User Node

Filtering Record in Dynamics Ax

December 8, 2007

Filtering capability is vital in making huge set of data manageable. Dynamics Ax offers a range of features to filter records.

Dynamics Ax filter toolbar

Filtering data enables users to focus on the subset of data relevant to their intended task. Dynamics Ax offers three ways to filter at its user interface. This is consistent across the whole system. In case there are needs for more specialized filtering, you may engineer them with X++.

Advanced Filter

This filtering option allows you to construct a query to filter records. You may access this feature by pressing Ctrl+F3 or selecting the Advanced Filter/Sort button on the toolbar. You will be presented with the Inquiry form. This form has an interface that is used in many occasions where filtering is applicable. You may define criteria in any field from the tables relevant to the form you are working on. This option allows multiple criteria on a single field. The following figure shows the familiar Inquiry form used for Advanced Filter.

Dynamics Ax advanced filter

This feature might be the most complete filtering option on Dynamics Ax user interface but it requires a little learning curve. It is not as intuitive as the other options where you work directly on the form. The user has to know the name of the field she wants to set filtering criteria.

Having said so, the other methods we will visit shortly sort of fills up this Inquiry form for the user. The user is presented with a more intuitive way of entering filter criteria.

Filter by Grid

This filtering option presents a way to enter criteria at the top of the grid. Criteria could be set for multiple columns and the result fulfills all criteria. The following figure illustrates the Filter by Grid feature. This feature however can only filter base on fields in a grid.

Dynamics Ax filter by grid

When you press the button at the side of the filter column, you will see a drop down list with a wealth of criteria type. Selecting these criteria type would append the syntax for the type. This exposes the choices of criteria at the fingertip. Once you have used to it however, you shall find typing on your own works more efficiently. We will discuss each type in a later section as they are applicable for other filtering options as well.

Filter by Field

This filtering option is accessible from the context menu on form itself. It is applicable to any field on the form by pressing the menu or right clicking on the field. The following figure shows the context menu for field Customer account in Sales order form. The menu items Filter By Field and Filter By Selection are where you access this filtering feature.

Dynamics Ax filter by field

Selecting Filter By Field will bring up a dialog box for you to fill in the filter criteria. The format of criteria is consistent with those in other search and will be discuss in greater detail later.

Filter By Selection will filter the record with the value of the field you selected. It is a Filter By Field with the value inserted for you.

Saving Filter Criteria

The ability to save filtering criteria is useful when the user has a few repetitive tasks that require different subset of records. Saving of filtering criteria could be done for all methods stated above. You could do so through the context menu (see figure above) as well as the Advanced Filter Inquiry form. Use Save filter As to create a new entry whereas use Save filter to save modification on an existing query.

On top of that, there will also be an auto saved query named Previously used query. The last defined filter will be saved under this name. This happened to all the filtering methods mentioned above.

Criteria Format

The filter criteria formats are base on a few elements. The following describe the elements and the special character.

CharacterDescription
*Could be substituted by any zero or more characters in a string.
?Could be substituted by one character.
!Exclude.
.. Inclusive range.
A .. B - between A and B inclusive of A and B.
A .. - greater than or equal to A
.. A - less than or equal to A
<Less than.
>Greater than.

The following table shows the construct of the criteria formats we saw in the Filter by Grid context menu earlier. As you can see, they are a combination of one or more elements from the table above. Much more formats are possible by combining more of these elements.

Criteria TypeFormat
Contains*[text]*
Does not contain!*[text]*
Starts with[text]*
Ends with*[text]
Is (exactly)[text]
Is not![text]
More than>[text]
Less than<[text]
More or equal[text]..
Less or equal..[text]

Final Thoughts

Technically, filtering is performed at the form data source level. Additional options are more towards user interface enhancement. More intuitive ways are definitely possible with some creativity.