Showing posts with label Development. Show all posts

Run External Application from Dynamics Ax

March 20, 2008

Calling up external program from Dynamics Ax can be something very interesting to audience during introductory training and demo. Once in a while, I will encounter associates asking if it is possible to run external program, open word document, open a URL in an external browser, etc. from within Dynamics Ax. Usually they will show a sign of immense enthusiasm when I show them how it is achieved. It is like their imagination is exploring all sort of creative ways to make use of this facility.

The interesting part is that executing external application is fairly effortless in Dynamics Ax. X++ is capable of calling Microsoft Windows Application Programming Interface (API). The common functionalities of the Win API have been built in classes WinAPI, WinAPIServer, WinGDI and WinInet. Running external application could be achieved through the static method WinAPI::shellExecute.

Static Method WinAPI::shellExecute

This method takes six parameters where five of them are optional parameters. The following code segment shows the interface of this method.

client static int shellExecute(
    Filename _lpFile,
    str      _lpParameters      = '',
    str      _lpDirectory       = '',
    str      _lpOperation       = #ShellExeOpen,
    int      _show              = #SW_SHOWNORMAL,
    boolean  _waitForCompletion = false
    )

The interface might look complicated but the first parameter is usually all we need to assign. It is sufficient to achieve most of the scenarios. The second parameter allows us to execute an executable with parameters. We will look at examples where this second parameter comes into play later.

Class SysShellExecute

The class SysShellExecute facilitates calling WinAPI::shellExecute. This class has a main method that call the method WinAPI::shellExecute using args.parm() as the first parameter. This enables WinAPI::shellExecute to be called from menu item with ease. This is important Dynamics Ax bring up windows through menu item. Menu item works with buttons with ease.

The following figure shows the property dialog of a menu item using SysShellExecute. The menu item shown will open an Internet Explorer browser when executed.
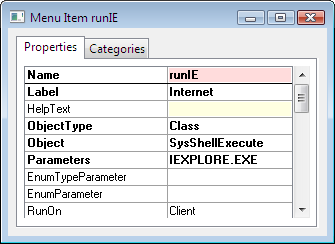
SysShellExecute Menu Item Property

Opening a File or URL

You shall not encounter any issue running application with class SysShellExecute. However, I have received enquiry when it comes to opening a file or a URL. I do not want to go into the ways they have tried. Basically opening file and URL are equally simple.

1. Default Application

Windows has associated different file type to a default application. We just need to execute the file name in order to open that file with the default application. The following figure shows the property page of a menu item that opens the website Dynamics Ax Associate in the default browser.
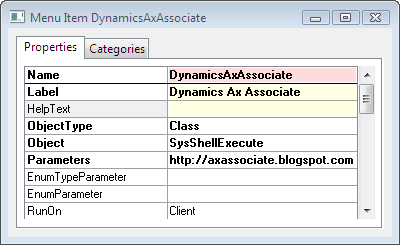
Open URL with SysShellExecute Menu Item

2. Specific Application

The previous approach opens the file or URL in the default application. There are cases where you need to specify the application to open the file with. You may achieve this with static method WinAPI::shellExecute.

Let say the default browser for your computer is FireFox and the website you are opening requires Internet Explorer. You may use the following code to open the URL with Internet Explorer.

WinAPI::shellExecute("IEXPLORE.EXE",
    "http://axassociate.blogspot.com");

Conclusion

The examples given above cover the execution of Windows Internet Explorer and opening of URL. They work similarly with a Word Document, Excel Spreadsheet, etc.

X++ Bitwise Operators

January 30, 2008

Bitwise operations are performed at the individual bits. In other words, the value is converted into binary format and the bitwise operators will act on each and every digit.

Bitwise operation is not very widely used in business solution development. The only time I remember using one was to track a series of states. The advantage is the set of states (true or false) could be altered in one operation. However, readability is not good.

Dynamics Ax provides a set of operators to perform such operation. They will be discussed subsequently. The examples you will find subsequently are base on 32-bit integers. The rest of the operators are Arithmetic and Assignment Operators, and Relational Operators.

& (AND)

This operator performs a binary AND on two expressions.

Syntax

expression1 & expression2

Example

print 10 & 8; //1010 AND 1000
pause; // 1000 -> 8

| (OR)

This operator performs a binary OR to two expressions.

Syntax

expression1 | expression2

Example

print 10 | 8; //1010 OR 1000
pause; // 1010 -> 10

^ (XOR)

This operator performs a binary XOR to two expressions.

Syntax

expression1 ^ expression2

Example

print 10 ^ 8; //1010 XOR 1000
pause; // 0010 -> 2

~ (NOT)

This operator performs a bitwise NOT to the expression on the right.

Syntax

~ expression

Example

print ~10; //NOT 1010
pause; // 11111111111111111111111111110101 -> -11

<< (Left Shift)

This operator requires two operands. Expression on the right specifies the number of bits to shift. A left shift takes the number of bit specified from the left and moves it to the right.

The common use of left shift is to multiply an integer by a power of 2. The syntax is equivalent to expression1 * 2 expression2.

Syntax

expression1 << expression2

Example

print 123 << 3; // 00000000000000000000000001111011 << 3
pause; // 00000000000000000000001111011000 -> 984

>> (Right Shift)

This operator is a reverse of Left shift. It also requires two operands and the expression on the right denotes the number of bits to shift. The different is that it will shift the bits from the right to the left instead.

Syntax

expression1 >> expression2

Example

print 984 >> 3; // 00000000000000000000001111011000 << 3
pause; // 00000000000000000000000001111011 -> 123

X++ Relational Operators

January 15, 2008

The relational operators are frequently used in conditional statements and the where clause of data manipulation statements. Other operators could be found in Arithmetic and Assignment Operators.

like

This operator compares two expressions with wildcards. It is used to evaluate the pattern of an expression. You use * as a wildcard for zero or more characters. The wildcard ? will represents any single character. This is similar to the Criteria Format discussed in Filtering Record in Dynamics Ax.

This operator returns true if the expression on the left matches the pattern supplied on the right. Otherwise, it returns false.

Syntax

expression like pattern

Example

str sExp = "Dynamics Ax associate";
;
print sExp like "*nam??s*ate"; // Output 1 - True
pause;

== (equal)

This operator compares two expressions for difference. It returns true if they are identical and false if they are different.

Syntax

expression1 == expression2

Example

str sExp = "Dynamics Ax associate";
;
print sExp == "*nam??s*ate"; // Output 0 - False
pause;

!= (not equal)

This operator is the opposite of the equal operator. It also compares two expressions for difference. However, it returns true if they are different and false if they are identical.

Syntax

expression1 != expression2

Example

str sExp = "Dynamics Ax associate";
;
print sExp != "*nam??s*ate"; // Output 1 - True
pause;

>=

This operator returns true if expression on the left is greater than or equal to expression on the right.

Syntax

expression1 >= expression2

Example

str sExp = "Dynamics Ax associate";
;
print sExp >= "Dynamics Ax"; // Output 1 - True
pause;

<=

This operator returns true if expression on the left is less than or equal to expression on the right.

Syntax

expression1 <= expression2

Example

str sExp = "Dynamics Ax associate";
;
print sExp <= "Dynamics Ax"; // Output 0 - False
pause;

>

This operator returns true if expression on the left is greater than the expression on the right.

Syntax

expression1 > expression2

Example

int nVar = 30;
;
print nVar > 30; // Output 0 - False
pause;

<

This operator returns true if expression on the left is less than the expression on the right.

Syntax

expression1 < expression2

Example

int nVar = 30;
;
print nVar < 30; // Output 0 - False
pause;

&& (AND)

This operator returns true if both expressions beside the operator is true. It returns false if either of the expression or both expressions are false.

Syntax

expression1 && expression2

|| (OR)

This operator returns true if either of the expressions beside the operator is true as well as when both of the expressions are true. It returns false only if both of the expression are false.

Syntax

expression1 || expression2

! (Not)

This operator takes one expression on its right. It negates the expression on its right. In other words, it returns false if the expression is true and returns true if the expression is false.

Syntax

! expression

X++ Operators - Arithmetic and Assignment

January 12, 2008

Every programming language has a set of operators. They are used almost everywhere in code. They form the foundation for building functionalities. Dynamics Ax associate believes it is helpful to know what is offered in X++.

This post will cover the arithmetic and assignment operators. In the discussion, you will find the word expression. The expression here could be as simple as a number or a combination of various variables, operators, etc.

=

This operator assigns the result of expression to the right to the variable on the left. It is called the assignment operator.

Syntax

variable = expression

Example

int nVar = 2;
;
nVar = 12 - 3;
print nVar; // nVar is now 9.
pause;

?

This is called the ternary operator because it requires three expressions. The expression on the left is a condition. It will result in either true or false. The two expressions on the right separated by a colon are the result of the operation. If the condition is true, the expression on the left of the colon is returned. Otherwise, expression on the right of the colon is returned instead.

Syntax

expression1 ? expression2 : expression3

Example

int nVar = 2;
;
print nVar < 3 ? nVar + 1 : nVar - 1; // print output 3.
pause;

+=

This operator combines an arithmetic addition with an assignment operator. This operator assigns the current value of the variable to the left plus the expression on the right back to the variable on the left.

Syntax

variable += expression

Example

int nVar = 2;
;
nVar += 12 - 3;
print nVar; // nVar is now 11.
pause;

-=

This operator combines an arithmetic deduction with an assignment operator. This operator assigns the current value of the variable to the left minus the expression on the right back to the variable on the left.

Syntax

variable -= expression

Example

int nVar = 2;
;
nVar -= 12 - 3;
print nVar; // nVar is now -7.
pause;

++

This operator is used to increase a variable by one. Although this could be achieve with of other operators but this operator produces cleaner code.

Syntax

variable ++

Example

int nVar = 2;
;
nVar ++;
print nVar; // nVar is now 3.
pause;

--

This operator is used to decrease a variable by one.

Syntax

variable --

Example

int nVar = 2;
;
nVar --;
print nVar; // nVar is now 1.
pause;

+ (Plus)

This operator performs addition of two expressions.

Syntax

expression1 + expression2

Example

print 3 + 2; // Print output 5.
pause;

- (Minus)

This operator performs subtraction of expression on the right from expression on the left.

Syntax

expression1 - expression2

Example

print 3 - 2; // Print output 1.
pause;

* (Multiply)

This operator multiplies two expressions.

Syntax

expression1 * expression2

Example

print 3 * 2; // Print output 6.
pause;

/ (Divide)

This operator divides expression on the left with expression on the right.

Syntax

expression1 / expression2

Example

print 3 / 2; // Print output 1.5.
pause;

DIV

This operator performs integer division on expression on the left by expression on the right.

Syntax

expression1 DIV expression2

Example

print 5 DIV 2; // Print output 2.
pause;

MOD

This operator returns the remainder of an integer division of expression on the left by expression on the right.

Syntax

expression1 MOD expression2

Example

print 5 MOD 2; // Print output 1.
pause;

Box: Dynamics Ax Message Box

December 23, 2007

There are scenarios where the system requires prompt user attention. The system may require decision from the user before proceeding, or having to inform the user of something important. This is usually done by freezing the application forcing the user to interact with a child window. This child window is known as a modal window.

An example could be found when you close a window after modifying the record. You will see a dialog box asking you whether you want to save changes. The following figure shows the window we are referring to.

Save changes reminder dialog box

Those experienced with other development platform might have searched for message box. In Dynamics Ax, this is achieved with the class Box. You may find it at AOT > Classes > Box. The methods to call various types of modal dialog boxes are visible.

Type 1: Notify user

This group produces a dialog box with an OK button. They are mainly used to notify user of something. There are three dialog boxes in this group with different icon; information, warning and error. The following are the three methods that produce this type of box. This is followed by a figure that shows a sample of such dialog box.

  1. box::info(str _text[, str _title, str _bottomText])
  2. box::warning(str _text[, str _title, str _bottomText])
  3. box::stop(str _text[, str _title, str _bottomText])
Dynamics Ax Box::info

Type 2: Detail Information Notification

This type of dialog box is meant to provide detail information. There is an option to provide link to further information. There is also an option to not show the dialog again.

There are two methods that produce such dialog box. The second one is an extended version of the first where the ability to define caption is available.

  1. box::infoOnce(str heading, str information, URL helpURL, str owner)
  2. box::infoOnceEx(str _heading, str _information, URL _helpURL, str owner, str caption, boolean _detach)
Box::infoOnce

Type 3: Request for Decision

This group provides more than one buttons that require user decision. They come with various buttons combinations. The button combination is denoted in the method name. The most common are OK Cancel and No Yes.

There is one such dialog box that offers the option not to show the dialog box again. It is a dialog box with Yes and No button plus a Do not ask again checkbox. This is achieved with the method box::yesNoOnce.

The following are the list of methods which also denotes their button combination. This is followed by a figure showing a sample of such dialog boxes.

  1. box::yesAllNoAllCancel(str _text, DialogButton _defaultButton [, str _title])
  2. box::yesNoAllNoCancel(str _text, DialogButton _defaultButton [, str _title])
  3. box::yesNoAxaptaForm(str _text, DialogButton _defaultButton [, str _title])
  4. box::yesNoCancel(str _text, DialogButton _defaultButton [, str _title])
  5. box::yesNoOnce(str _title, str _text, DialogButton _defaultButton, str _owner)
  6. box::yesYesAllNoCancel(str _text, DialogButton _defaultButton [, str _title])
Box::yesNoAllCancel

Summary

The message box facility in X++ is fairly well done. The parameters are self descriptive. We are offered up to date feature such as the Do not ask again checkbox. In case there are more types required, the class Box could be easily extended to provide more choices.

Break and Continue

December 21, 2007

Break and continue keywords help control the flow of execution. They could be used everywhere in the code. However, they are commonly used in loops and switch statements because that is where they are most needed.

Similarity and Difference

Basically both break and continue are very much similar. They both tell the compiler to skip the rest of the code. How much code is skipped depends on where it is used. When used within a switch statement or the three loops, only code within the structure is affected. Otherwise, the whole method will be affected.

The difference appears when used within a loop. In a loop, continue will skip the rest of the loop and continue running the next loop. If break is used instead, the whole loop will be abandoned. Execution will continue after the loop.

Switch statement

Break is commonly seen in switch statement. The switch statement in X++ is similar to those of C language. Execution begins at the case node that fulfils the criteria until the end of the switch structure. A break keyword is used to stop executing the rest of the structure.

The objective here is to stop executing the rest of the code within the switch statement. Base on the behavior of two statements discussed above, using continue here will just produce the same result.

While Loop, Do While Loop and For Loop

This is where a choice between the two statements will make a different. The following code segment demonstrates the effect of keywords break and continue in a loop.

The code segment prints the even number within 1 to 10. The do while loop here is an infinite loop. The keyword break is used to end the loop when exit condition is fulfilled. The keyword continue is used to decide whether to execute the rest of the loop which in turn prints the number.

int nCtr;
;
// print even number from 1 to 10.
do {
    nCtr ++;

    // ends loop if exceeded 10.
    if (nCtr > 10) {
        break;
    }

    // do not print the number if not even.
    if (nCtr mod 2) {
        continue;
    }

    print nCtr;
} while(1);

Method Exit Point

There is a common practice to exit a method in the middle for methods that returns a value. This is less seen in void methods. The keywords break and continue could be used to achieve this for void methods.

Development To-do List inside Dynamics Ax

December 14, 2007

I supposed most of us if not all keep a list of tasks to be performed. This list keeps us connected to our goals. It shows us steps to achieve our objectives. Some call this list the to-do list. Others call this the task list or even action items.

Task list is commonly used in solution development process as well. Solution development is about achieving goals in compliance with the principles of the software engineering discipline. The steps required could be complicated. Having a medium to keep everyone on track makes a different.

Dynamics Ax TODO

Microsoft Dynamics Ax has the to-do list built into its compiler. You write your to-do tasks in the code itself. Dynamics Ax will pick them up when it compiles the code. The list will be shown in the Compiler output window.

You add to-do by writing a single line comment or remark starting with the word TODO in uppercase. The following code segment shows the sample code for adding a task list entry. Please note that the word TODO has to be in uppercase. Removing this line of code will remove the entry from the task list.

void click()
{
    //TODO Make yourself happy.
}

The following figure shows an output of Dynamics Ax built in To-do list. Note that it is grouped by Application object and Method/Property. You may sort the list by such information. Double clicking on the entry will bring you to the exact location of that task. You will be presented with the code opened in the X++ Code Editor.

Dynamics Ax Compiler Output - Task

Rationale

What are the common actions you perform on a to-do list? Basically, you add new tasks to the list and remove items that are completed from the list. You may also sort and categorize items to make it more organized.

The to-do list in Dynamics Ax makes us add the reminder at the location most relevant. Categorization is automatically done base on the location of the note. Once we have completed the task, we are most likely at the exact location to remove the entry.

Possibilities

The following are three ways Dynamics Ax associate believes this feature could help in projects.

1. Extension to Project Task Tracking.

Dynamics Ax to-do list would be a great extension to your project task tracking. I believe most of the projects define development tasks to the level of feature description. It is tough to go more detail with external tools.

Tracking steps to construct a feature could be easily done with this tool. The activities and the to-do list are entirely integrated. You should not have the bottleneck that would occur when tracked to such level of detail externally.

2. Reminder for busy Developer

Dynamics Ax engineers could use this TODO as a reminder. It is common for developers to left something in the middle to attend to presumably more important tasks. You could easily leave a reminder with Dynamics Ax To-do.

3. Project Team Communication

The to-do list in Dynamics Ax is visible to everyone connecting to the same instance of Dynamics Ax. Project team members would be able to leave note of pending tasks for the rest to take note or follow up. It can also be used by senior team members to communicate guidelines to new team members. The guidelines could be embedded at the appropriate location inside the code itself.

I am sure there are more possibilities with some creativity. Those that have experience using this feature or with ideas are welcome to share with our fellow associates.

Base Enum without Default Value

December 12, 2007

Ever come across the need to capture enumerated data without the value filled in by default? We are going to look at two approaches and how they behave in different controls.

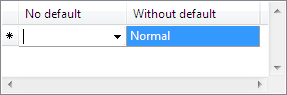
Enumerated data without default value here refers to fields with data type Base Enum that is not filled in when a new record is created. In other words, you would like the user to deliberately or implicitly select a value. The following figure shows a grid with new record. There are two columns both are of enumerated data type. The first column has no default value whereas the second has Normal as its default value.

Base Enum with and without default value

Approach #1: Blank Element Zero

One way to achieve this is to have the default element (value 0) configured with blank label. The following figure shows the setting for this approach. Element named “None” is the default element. Note that the label of this element is blank.

Base Enum with Blank Element Zero

This figure shows Base Enum FreightSlipType. You could see the corresponding field in Sales Order form. There is a field labeled Call tag type in the Delivery tab based on this Base Enum.

Approach #2: No Element Zero

The other way this is achieved is have no element with the value 0 in the Base Enum. The default value for an enumeration is zero. This will have the default value refers to none of the members of the enumeration.

The following figure shows a Base Enum with member elements starting from value 1. This Base Enum is created to illustrate this approach.

Base Enum with No Element Zero

Approach #1 vs Approach #2

I have created a form with the two methods of achieving no default value and a field with default value to show how they behave in different controls. The following figure shows the three types of Base Enum in three type of controls; combo box, radio button and list box.

Base Enum approach Comparison

In combo boxes, you see that both approaches started without a value. The drop down list for approach #1 (Call tag type) contains an empty line. This does not happen to the drop down list of approach #2 (No default). This means approach #1 enables the user to revert the value to empty but not the product of approach #2.

When the Base Enums are shown with radio button and list box, you will get an empty radio button and empty list entry respectively. Naturally, this does not affect radio button and list box based on approach #1.

Conclusion

Both approaches have their pros and cons. There are conditions where one is more suitable than the other.

Having blank element 0 produces a field that requires the user to choose a value and can be reverted to blank. This approach looks fine on a combo box but does not look good on radio button and list box. It is suitable for cases where it is optional.

Having no element 0 on the other hand produces a field that forces the user to pick a value. Once picked, the value cannot be reverted to blank. It can only be changed to some other value in the enumeration. This approach looks fine in all controls. It works very well to enforce mandatory field.